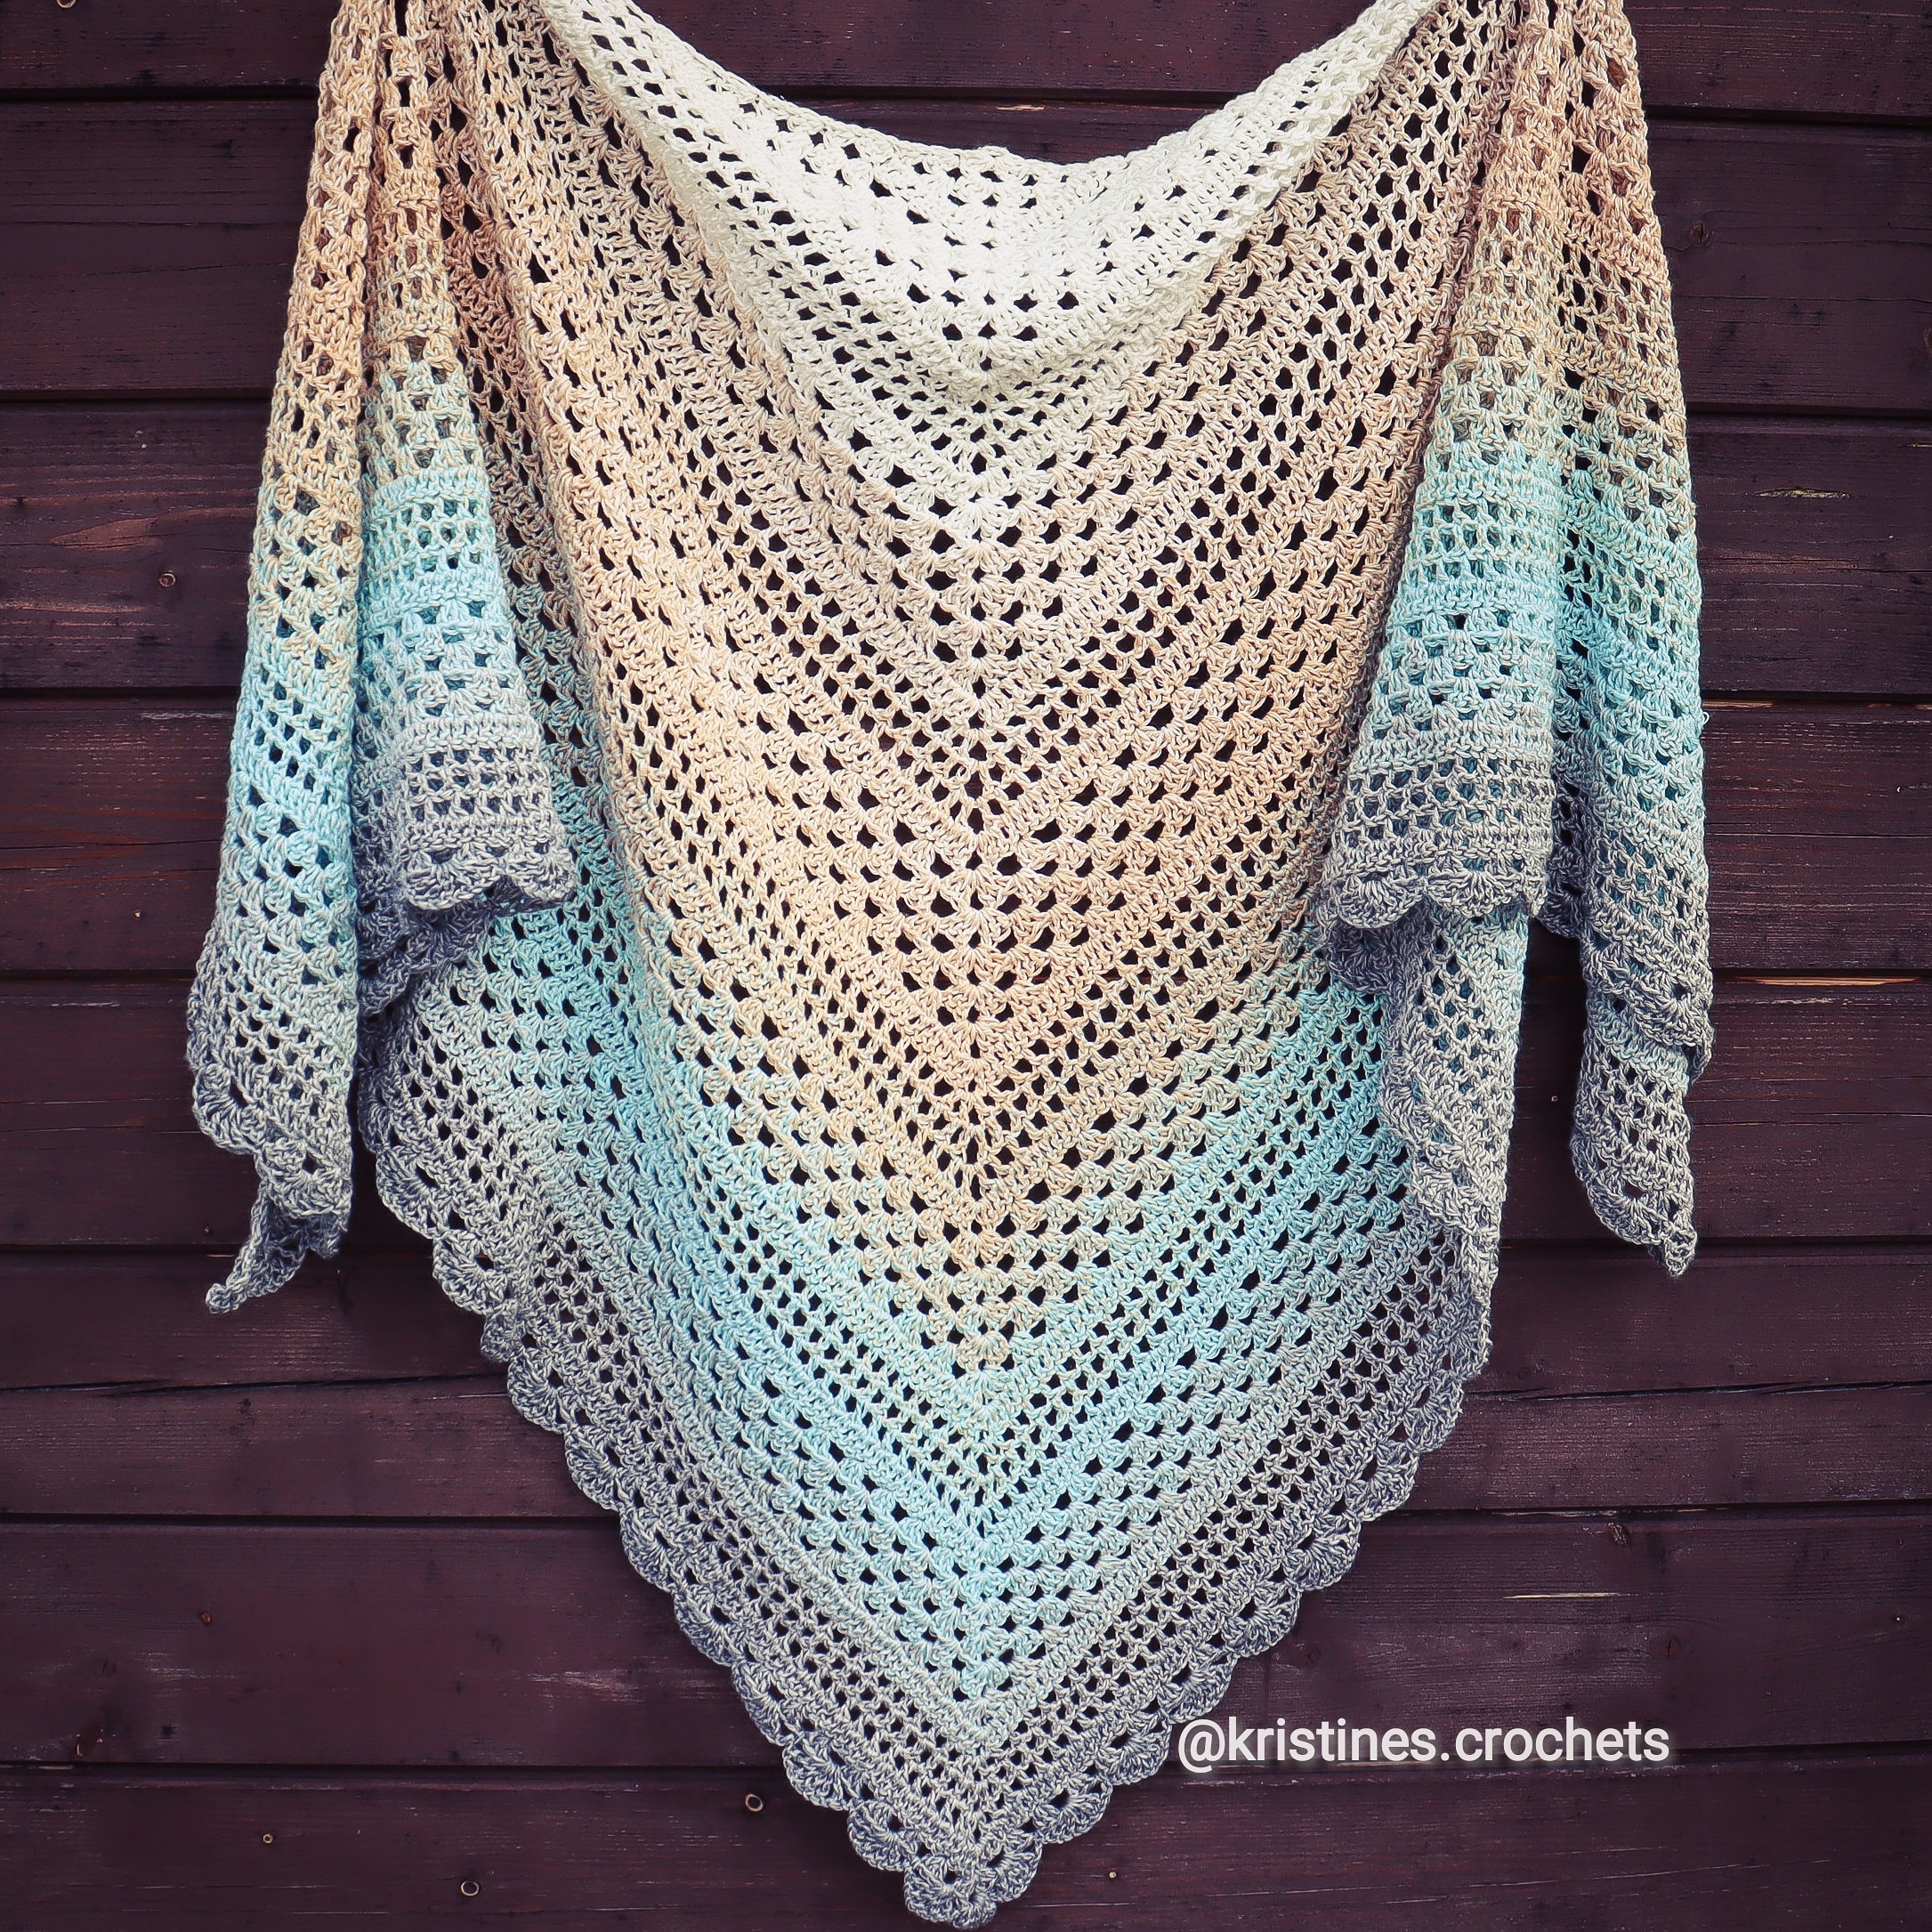
Showing posts with label Accessories. Show all posts

Saturday, 30 August 2025

Textured Serenity Tote Bag - Free Crochet Pattern


Hi everyone!πŸ™‚

Make your own Textured Serenity Bag, a versatile and stylish crochet tote, perfect for everyday use. The pattern features a beautiful combination of double crochet and front post double crochet stitches, creating lovely texture and dimension. It's worked from the bottom up in joined rounds.The handle straps are crocheted directly onto the body so the bag is one piece with no extra seaming.
I used YarnArt Macrame Cotton braidedcord type yarn (thickness - approx 2,5 mm), but any worsted weight cotton or cotton blend yarn will work.

If you want to learn how to crochet this bag, I have a video tutorial for you below. Or scroll down to view the written pattern!


Happy Crocheting! 😊


You can also purchase the ad free printable PDF version of this pattern on my Etsy Shop


Video Tutorial:


Written Pattern:


Finished size:
Width: 34cm (13,4'')
Height without handle straps: 31 cm (12,2'') Height with handle straps: 50 cm (19,7'') Depth: 9cm (3,5'')


Gauge: 8 stitches x 3,5 rows = 5 cm (2’’) in double crochet

Skill Level: Easy to Intermediate (advanced beginner)

Materials Used:

  • Worsted - Aran weight cord type yarn, size 4 - medium. I used YarnArt Macrame Cotton - (250 grams / 225 meters) - 80% Cotton, 20% Polyester. You will need approx 360 metres (2 skeins).
  • 4 mm crochet hook.
  • Scissors.
  • Yarn needle.
  • 4 stitch markers (optional).
  • Measuring tape.


Abbreviations (US terms):

st./sts - stitch / stitches
sk - skip
ch - chain
sl st. - slip stitch
sc - single crochet
dc - double crochet
fpdc - front post double crochet

( )* - repeat the instructions between the parentheses as directed.

( ) - stitch count for each row is listed in italic parentheses at the end of each row.

Special Stitch Instructions:
  • fpdc - front post double crochet - Yarn over, insert the hook around the post of the stitch from front to back to front, yarn over, pull up a loop, yarn over, pull through 2 loops on your hook, yarn over, pull through remaining 2 loops on hook.


Pattern Notes:
  • The bag is worked from the bottom up, in joined rounds.
  • You can adjust the width of the bag by adding or subtracting chain stitches of the foundation chain in a multiple of 4.
  • You can adjust the height of the bag by adding or subtracting pattern repeats (Round 5 - 6).
  • You can adjust the length of handles by increasing or decreasing the chains in Round 22.
  • Rounds are joined with a slip stitch – do not include the joining slip stitch in your stitch count.


Instructions:


BASE

Foundation chain: ch32 (multiples of 4)

Round 1: 3dc in 3rd ch from hook, 1dc in each of next 28 ch sts., 6dc in last ch st.,
1dc in each of next 28 ch sts. on the other side of the foundation chain, 3dc in next ch st.
Join the round with a sl st. in first dc st.
(68 dc sts.)

Round 2: ch2 (doesn't count as a st.), 2dc in same st., 2dc in each of next 2 sts., 1dc in each of next 28 sts, 2dc in each of next 6 sts, 1dc in each of next 28 sts, 2dc in each of remaining 3 sts.
Join the round with a sl st. in first dc st.
(80 dc sts.)

Round 3: ch2 (doesn't count as a st.), 2dc in same st., 2dc in each of next 3 sts., 1dc in each of next 32 sts, 2dc in each of next 8 sts, 1dc in each of next 32 sts, 2dc in each of remaining 4 sts.
Join the round with a sl st. in first dc st.
(96 dc sts.)


BODY

Round 4: ch3 (counts as 1dc), sk next st., 3dc in next st.,
(sk next st., 1dc in next st., sk next st., 3dc in next st.)* repeat 23 times around.
Join the round with sl st. in 3rd ch of beginning ch3.
(96 dc sts.)

Round 5: ch3 (counts as 1dc), 2dc in same st., sk next st., 1fpdc in next st.,
(sk next st., 3dc in next st., sk next st., 1fpdc in next st.)* repeat 23 times around.
Join with a sl st. in 3rd ch of beginning ch3.
(72 dc sts., 24 fpdc sts.)

Round 6: drop loop from hook, insert hook from back to front through next st., place dropped loop back on hook and pull it through to the back.
ch2 (doesn't count as a st.), 1fpdc in same st. (around dc st. below), sk next st., 3dc in next st.,
(sk next st., 1fpdc in next st., sk next st., 3dc in next st.)* repeat 23 times around.
Join the round with a sl st. in first fpdc st.
(72 dc sts., 24 fpdc sts.)


Round 7 - 20: repeat Round 5 - 6


Round 21: ch1 (doesn't count as a st.), 1sc in same st., 1sc into each st. around. 
Join the round with a sl st. in first sc. 
(96 sc sts.)


HANDLE STRAPS

You can choose one of the following methods for starting the handle strap round (Round 22). Choose the method that works best for you!

Method 1: Using stitch counts

Round 22: ch1 (doesn’t count as a st.), 1sc in same st., 1sc in each of next 16 sts, ch60, sk next 21 sts, 1sc in each of next 27 sts, ch60, sk next 21 sts, 1sc in each of remaining 10 sts until the end of round.
Join with a sl st. in first sc st.      
(54 sc sts, 120 ch sts.)

Method 2: Using measurements and stitch markers

Lay your bag on a flat surface and place stitch markers approx 9 cm (3,5'') from the sides of the bag to mark the handle strap positions (2 stitch markers on front and 2 on back panel of the bag). Make sure that they are in the same place on both sides and continue with Round 22 as follows:

 ch1 (doesn't count as a st.), 1sc in same st., 1sc in each st. until you get to the first stitch marker, remove the marker and work 1sc in the marked st.

Ch60, skip all stitches until the second stitch marker, remove the marker, work 1sc in the marked st., 1sc in each st. until you get to the third stitch marker, remove the marker, 1sc in the marked st.

Ch60, skip all stitches until the fourth stitch marker, remove the marker, 1sc in the marked st., 1sc in each st. until the end of the round.

Join with a sl st. in first sc st.


Round 23: ch1 (doesn't count as a st.), 1sc in same st., 1sc in each st. and each ch st. around.
Join the round with a sl st. in first sc st.
(174 sc sts.)

Round 24: ch1 (doesn't count as a st.), 1sc in same st., 1sc in each st. around.
Join the round with a sl st. in first sc st.
(174 ch sts.)

Round 25: ch1 (doesn't count as s st.), sl st. in same st., sl st. in each st. around.
(174 sl sts.)

After the last st. you can choose one of the following methods to join the round:

Invisible join for a seamless finish:
Cut the yarn the yarn and pull the loop all the way through. Using a yarn needle, create an invisible join: insert the needle from back to front through the first st., then insert it in the back loop of the last st. Pull to shape the stitch, weave in ends.

Slip stitch join:
Join the round with a sl st. in first sl st.
Fasten off and weave in ends.


Pattern Terms of Use:

The patterns on this website are my original designs created by me.
Please do not copy, rework, distribute, republish or sell my patterns and photos. 
Do not create video tutorials free or paid.
You are welcome to sell finished items made from this pattern in small quantities, as long as you credit the design to KristinesCrochets.

Thank you!


©2025 KristinesCrochets 


Thursday, 10 July 2025

Hibiscus Sorbet Shawl - Crochet Triangle Shawl Pattern


Hi Everyone!πŸ™‚
Today I would like to share with you my Hibiscus Sorbet Shawl crochet pattern. This simple yet elegant lightweight triangle shawl is perfect for transitional weather or layering year-round. Designed with Alize Bella Ombre Batik yarn, the gentle gradient adds seamless color flow that enhances the stitch definition.
The shawl is worked in back and forth rows from the top center down.
The pattern is worked using crochet stitches such as: chain, single crochet, double crochet, front post double crochet and V-stitch. 
All you need to start is one skein of your favourite fingering weight yarn and a 4 mm crochet hook.

If you prefer to learn by watching, I have a video tutorial below. Or scroll down to view the written pattern!

Happy Crocheting! 😊


You can also purchase the ad free printable PDF version of this pattern on my Etsy Shop


Written Pattern

Finished Size: Height – 75 cm (29,5 inches) , Width – 170 cm (67 inches).
                                                  The size can be adjustable!

Gauge: 19dc sts x 10 rows = 10cm x 10cm (4’’ x 4’’) in pattern stitch.

Skill Level: Intermediate - advanced beginner.


Materials Used:

  • Fingering weight yarn, size 1 - super fineI used Alize Bella Ombre Batik 100% cotton yarn in color 7429. 1 skein (830 meters approx.) of yarn needed for this pattern.
  • 4.0 mm (US size G/6) crochet hook.
  • Scissors.
  • Yarn needle or a latch hook. 


  • Abbreviations (US terms):

    sk - skip
    ch sp. - chain space
    st./sts - stitch / stitches
    ch - chain
    sc - single crochet

    dc - double crochet
    fpdc - front post double crochet
    V-st. - V stitch (1dc, ch1, 1dc) in same stitch or space

    RS – right side – the front side of the work.
    WS – wrong side – the back side of the work.

    [ ] - work all stitches inside brackets in the same stitch or space.

    ( )* - repeat the instructions between the parentheses as directed.

    ( ) - stitch count for each row is listed in italic parentheses at the end of each row.


    Special Stitch Instructions:
    • fpdc - front post double crochet - Yarn over, insert the hook around the post of the stitch from front to back to front, yarn over, pull up a loop, yarn over, pull through 2 loops on your hook, yarn over, pull through remaining 2 loops on hook.
    • V-st. between next 2 V-sts. – Work (1dc, ch1, 1dc) in the space between next 2 V-sts. – in the space between the sets, not in the ch1 space of a V-st.


    Pattern Notes:
    • The shawl is worked in back and forth rows from the top center down, expanding in size with increases along the edges and at the center.
    • Beginning (turning) chains count as stitches – ch3 counts as 1dc, ch4 counts as 1dc + ch1.
    • You can adjust the size of the shawl by adding or subtracting pattern repeats (Rows 3 – 12).
    • You may optionally place a stitch marker in the center chain space to help track the shawl’s center.
    • Blocking is recommended to enhance stitch definition and shape.


    Instructions

    Start with magic (adjustable) ring. Or, ch4 and sl st. in first ch to form a ring.

    Row 1 (WS): ch4 (counts as 1dc + ch1), [1dc, ch1, 1dc, ch2, 1dc, ch1, 1dc, ch1, 1dc] in ring.
    (6dc, 4 ch1 sps., 1 ch2 sp.(center))

    Row 2 (RS): ch3 (counts as 1dc), turn, 2dc in first st., (1dc in next ch1 sp., 1dc in next st.)* repeat 2 times,
    [2dc, ch2, 2dc] in center ch2 sp., 1dc in next st., 1dc in next ch1 sp., 1dc in next st.,
    1dc in turning ch4 sp. from previous row, 3dc in 3rd ch of that same ch4.
    (18dc, 1 ch2 sp.(center))

    Row 3 (WS): ch4 (counts as 1dc + ch1), turn, V-st. in first st.,
    (sk next 2 sts., V-st. in next st.)* repeat until 2 sts. remain before the ch2 sp. at the center,
    sk next 2 sts., [V-st., ch2, V-st.] in center ch2 sp.,
    (sk next 2 sts., V-st. in next st.)* repeat until 2 sts. and turning ch3 remain,
    sk next 2 sts., [V-st., ch1, 1dc] in 3rd ch of turning ch3 from previous row.
    (2dc, 2 ch1 sps., 8 V-sts., 1 ch2 sp.(center))

    Row 4 (RS): ch4 (counts as 1dc + ch1), turn, V-st. in ch1 sp.,
    (V-st. between next 2 V-sts.)* repeat until 1 V-st. remain before the ch2 sp. at the center,
    sk next V-st., [V-st., ch2, V-st.] in center ch2 sp.,
    (V-st. between next 2 V-sts.)* repeat until 1 V-st. and turning ch4 remain,
    sk next V-st., V-st. in turning ch4 sp. from previous row, ch1, 1dc in 3rd ch of that same ch4.
    (2dc, 2 ch1 sps., 10 V-sts., 1 ch2 sp.(center))


    Rows 5 - 7: repeat Row 4.
    Stitch count increases by 2 V-sts. per row.
    R5 (WS): 2dc, 2 ch1 sps., 12 V-sts., 1 ch2 sp.(center); R6 (RS): 2dc, 2 ch1 sps., 14 V-sts., 1 ch2 sp.(center);
    R7 (WS): 2dc, 2 ch1 sps., 16 V-sts., 1 ch2 sp.(center)


    Row 8 (RS): ch3 (counts as 1dc), turn, 2dc in first st., 1dc in next ch1 sp.,
    (1dc in first dc of next V-st., 1dc in ch1 sp., 1dc in second dc of same V-st.)* repeat until ch2 sp. at the center,
    [2dc, ch2, 2dc] in center ch2 sp.,
    (1dc in first dc of next V-st., 1dc in ch1 sp., 1dc in second dc of same V-st.)* repeat until turning ch4 remains,
    1dc in turning ch4 sp. from previous row, 3dc in 3rd ch of that same ch4.
    (60dc, 1 ch2 sp.(center))

    Row 9 (WS): ch4 (counts as 1dc + ch1), turn, 1dc in first st., ch1,
    (sk next st., 1fpdc in next st., ch1)* repeat until 1st. remains before the ch2 sp. at the center,
    sk next st., [1dc, ch2, 1dc] in center ch2 sp., ch1,
    (sk next st., 1fpdc in next st., ch1)* repeat until 1 st. and turning ch3 remain,
    sk next st., [1dc, ch1, 1dc] in 3rd ch of turning ch3 from previous row.
    (6dc, 28fpdc, 32 ch1 sps., 1 ch2 sp.(center))

    Row 10 (RS): ch3 (counts as 1dc), turn, 2dc in first st.,
    (1dc in next ch1 sp., 1dc in next st.)* repeat until ch2 sp. at the center,
    [2dc, ch2, 2dc] in center ch2 sp., 1dc in next st.,
    (1dc in next ch1 sp., 1dc in next st.)* repeat until turning ch4 remains,
    1dc in turning ch4 sp. from previous row, 3dc in 3rd ch of that same ch4.
    (74dc, 1 ch2 sp.(center))

    Row 11 (WS): ch4 (counts as 1dc + ch1), turn, 1dc in first st., ch1,
    (sk next st., 1fpdc in next st., ch1)* repeat until ch2 sp. at the center,
    [1dc, ch2, 1dc] in center ch2 sp., ch1, 1fpdc in next st., ch1,
    (sk next st., 1fpdc in next st., ch1)* repeat until 1 st. and turning ch3 remain,
    sk next st., [1dc, ch1, 1dc] in 3rd ch of turning ch3 from previous row.
    (6dc, 36fpdc, 40 ch1 sps., 1 ch2 sp.(center))

    Row 12 (RS): ch3 (counts as 1dc), turn, 2dc in first st.,
    (1dc in next ch1 sp., 1dc in next st.)* repeat until ch2 sp. at the center,
    [2dc, ch2, 2dc] in center ch2 sp., 1dc in next st.,
    (1dc in next ch1 sp., 1dc in next st.)* repeat until turning ch4 remains,
    1dc in turning ch4 sp. from previous row, 3dc in 3rd ch of that same ch4.
    (90dc, 1 ch2 sp.(center))

    Rows 13 - 52: repeat Rows 3 - 12 four more times!

    Row 53 (WS): ch4, turn, 1dc in first st. - ch4 + 1dc counts as first V-st.,
    (sk next 2 sts, V-st. in next st.)* repeat until 2 sts. remain before the ch2 sp. at the center,
    sk next 2 sts, [V-st., ch3, V-st.] in center ch2 sp.,
    (sk next 2 sts, V-st. in next st.)* repeat until 2 sts. and turning ch3 remain,
    sk next 2 sts., V-st. in 3rd ch of turning ch3 from previous row.
    (128 V-sts., 1 ch3 sp.(center))


    Row 54 (RS): ch3 (counts as 1dc), turn, [1dc, ch2, 2dc] in first V-st., ch1, 1sc in next V-st., ch1,
    ([2dc, ch2, 2dc] in next V-st., ch1, 1sc in next V-st., ch1)* repeat until ch3 sp. at the center,
    [3dc, ch2, 3dc] in center ch3 sp., ch1, 1sc in next V-st., ch1,
    ([2dc, ch2, 2dc] in next V-st., ch1, 1sc in next V-st., ch1)* repeat until last V-st. remains,
    [2dc, ch2, 1dc] in last V-st., 1dc in 3rd ch of turning ch4 (counts as part of last V-st. from previous row).
    (64 groups of [2dc, ch2, 2dc], 64sc, 128 ch1 sps., [3dc, ch2, 3dc] in center ch3 sp.)


    Fasten off, weave in all ends! Block your shawl!


    PDF available for purchase.
    The printable PDF version of this pattern with detailed photos and stitch counts for each row is available for purchase in my Etsy Shop


    Other Triangle Shawl Patterns You Might Enjoy:


    Pattern Terms of Use:

    The patterns on this website are my original designs created by me.
    Please do not copy, rework, distribute, republish or sell my patterns and photos. 
    Do not create video tutorials free or paid.
    You are welcome to sell finished items made from this pattern in small quantities, as long as you credit the design to KristinesCrochets.

    Thank you!


    ©2025 KristinesCrochets 


    Friday, 9 August 2024

    Simple & Elegant Triangle Shawl - Free Crochet Pattern


    Hi Everyone!πŸ™‚

    Today I would like to introduce you to the Simple & Elaegant ShawlThis beautiful triangle shawl is worked from the top down, in back and forth rows. To make this item, you should be familiar with basic crochet stitches and terminology. All you need to start is your favourite fingering weight yarn and a     4 mm crohet hook.  

    If you prefer to learn by watching, I have a video tutorial below. Or scroll down to view the written pattern!

    Happy Crocheting! 😊


    Written Pattern

    Finished Size: Height - 74 cm (29''), Width - 164 cm (64,5'').
    You can adjust the size of the shawl by adding or subtracting pattern repeats.
    1 pattern repeat (Row 6 - 7). I worked a total of 55 rows.

    Skill Level: Easy (advanced beginner)

    Materials Used:

  • Fingering weight yarn (4 ply), size 1 - super fineI used 1 skein of McLana Bobbel Farbverlaufsgarn 4-fach yarn (200 grams / 750 meters) in color 8581
  • 4.0 mm (US size G/6) crochet hook.
  • Scissors.
  • Yarn needle or a latch hook for weaving in ends.


  • Abbreviations (US terms):

    sk - skip
    sp/sps - space / spaces
    st./sts - stitch / stitches
    ch - chain
    sc - single crochet

    dc - double crochet

    (  )* – repeat instructions between the brackets as directed.


    PATTERN NOTES:

    •  The shawl is worked from the top down, in back and forth rows.
    • Beginning (turning) ch3 counts as 1dc.
    • Pattern repeat : Row 6 – 7.


    Instructions


    Row 1: ch4, (2dc, ch1, 3dc) in 4th ch from hook.
    (6dc (including beginning ch3), 1 ch1 sp in center)


    Row 2:
    ch3 (counts as 1dc), turn, 1dc in first st., ch5, sk 2 sts., (1dc, ch2, 1dc, ch2, 1dc) in center ch1 sp., ch5, sk 2 sts., 2dc in last st. (in 3rd ch of beginning ch3)
    (2 groups of 2dc, 2 ch5 sps, 1 group of (1dc, ch2, 1dc, ch2, 1dc) in center)


    Row 3:
    ch3 (counts as 1dc), turn, 4dc in first st., 1sc in next ch5 sp., 5dc in first center ch2 sp., ch1, 5dc in next center ch2 sp., 1sc in next ch5 sp., sk 1 st., 5dc in last st. (in 3rd ch of turning ch3)
    (4 groups of 5dc, 2sc, 1 ch1 sp in center)


    Row 4:
    ch3 (counts as 1dc), turn, 1dc in first st., ch5, sk 2 sts, 1sc, ch5, sk 3 sts., 1sc, ch5, sk 3 sts., (1dc, ch2, 1dc, ch2, 1dc) in center ch1 sp, ch5, sk 3 sts., 1sc, ch5, sk 3 sts., 1sc, ch5, sk 2 sts., 2dc in last st. (in 3rd ch of turning ch3)
    (2 groups of 2dc, 6 ch5 sps., 4 sc, 1 group of (1dc, ch2, 1dc, ch2, 1dc) in center)


    Row 5: ch3 (counts as 1dc), turn, 4dc in first st., 1sc in next ch5 sp., 7dc in next ch5 sp., 1sc in next ch5 sp., 5dc in first center ch2 sp., ch1, 5dc in next center ch2 sp., 1sc in next ch5 sp., 7dc in next ch5 sp., 1sc in next ch5 sp., sk 1 st., 5dc in last st. (in 3rd ch of turning ch3).
    (4 groups of 5dc, 4 sc, 2 groups of 7dc, 1 ch1 sp in center)


    Row 6: ch3 (counts as 1dc), turn, 1dc in first st., ch5, sk 2 sts., 1sc, 
    (ch5, sk 3 sts., 1sc)* repeat until 3 sts. left to center ch1 sp., 
    ch5, sk 3 sts., (1dc, ch2, 1dc, ch2, 1dc) in center ch1 sp., 
    (ch5, sk 3 sts., 1sc)* repeat until 3 sts. left to the end of the row,
    ch5, sk 2 sts., 2dc in last st. (in 3rd ch of turning ch3).
    (2 groups of 2dc, 10 ch5 sps., 8 sc, 1 group of (1dc, ch2, 1dc, ch2, 1dc) in center)


    Row 7: ch3 (counts as 1dc), turn, 4dc in first st., 1sc in next ch5 sp., 
    (7dc in next ch5 sp., 1sc in next ch5 sp.)* repeat until center group of (1dc, ch2, 1dc, ch2, 1dc),
    5dc in first center ch2 sp., ch1, 5dc in next center ch2 sp., 1sc in next ch5 sp.,
    (7dc in next ch5 sp., 1sc in next ch5 sp.)* repeat until 2 sts. left to the end of the row,
    sk 1 st., 5dc in last st. (in 3rd ch of turning ch3).
    (4 groups of 5dc, 4 groups of 7dc, 6sc, 1 ch1 sp. in center)


    Repeat Rows 6 - 7 with increases in each row until you reach the desired length. I worked a total of 55 rows.

    Once you've finished, fasten off and weave in any loose ends.
    Block your shawl!


    Other Triangle Shawl Patterns You Might Enjoy:


    The patterns on this website are my original designs created by me.
    Please do not copy, rework, distribute, republish or sell my patterns and photos. 
    Do not create video tutorials free or paid.

    Thank you!


    ©2024 KristinesCrochets 


    Textured Serenity Tote Bag - Free Crochet Pattern

    Hi everyone!πŸ™‚ Make your own Textured Serenity Bag , a versatile and stylish crochet tote, perfect for everyday use. The pattern features a ...