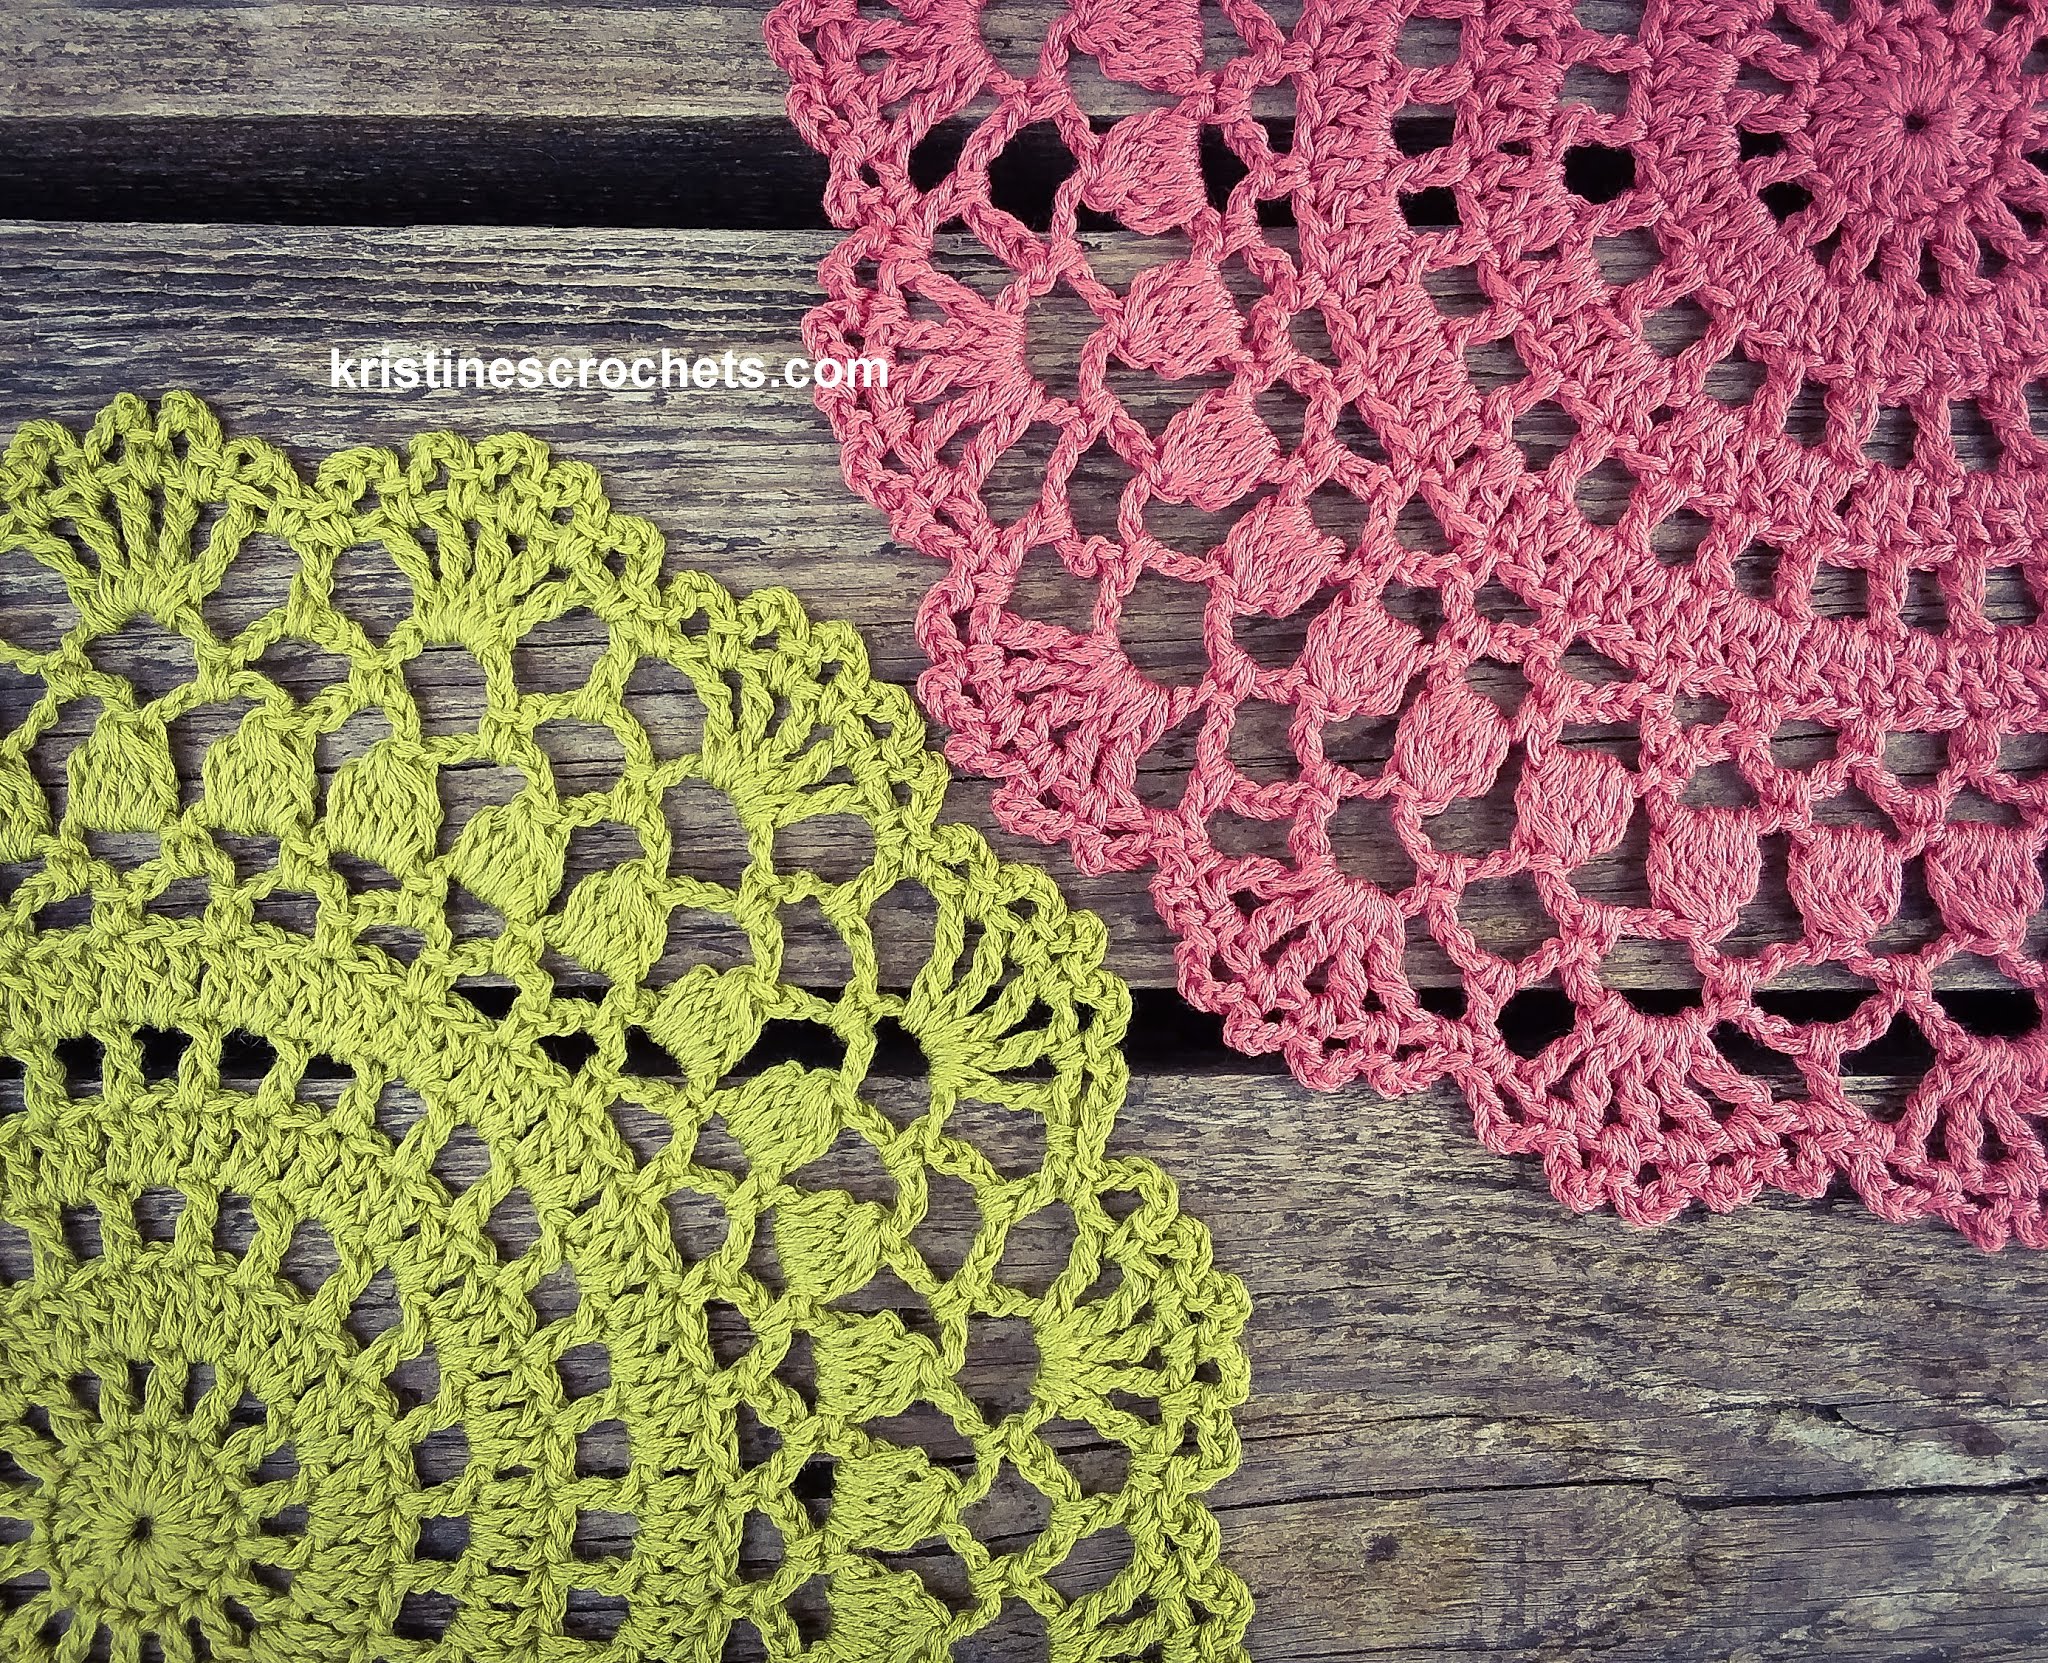
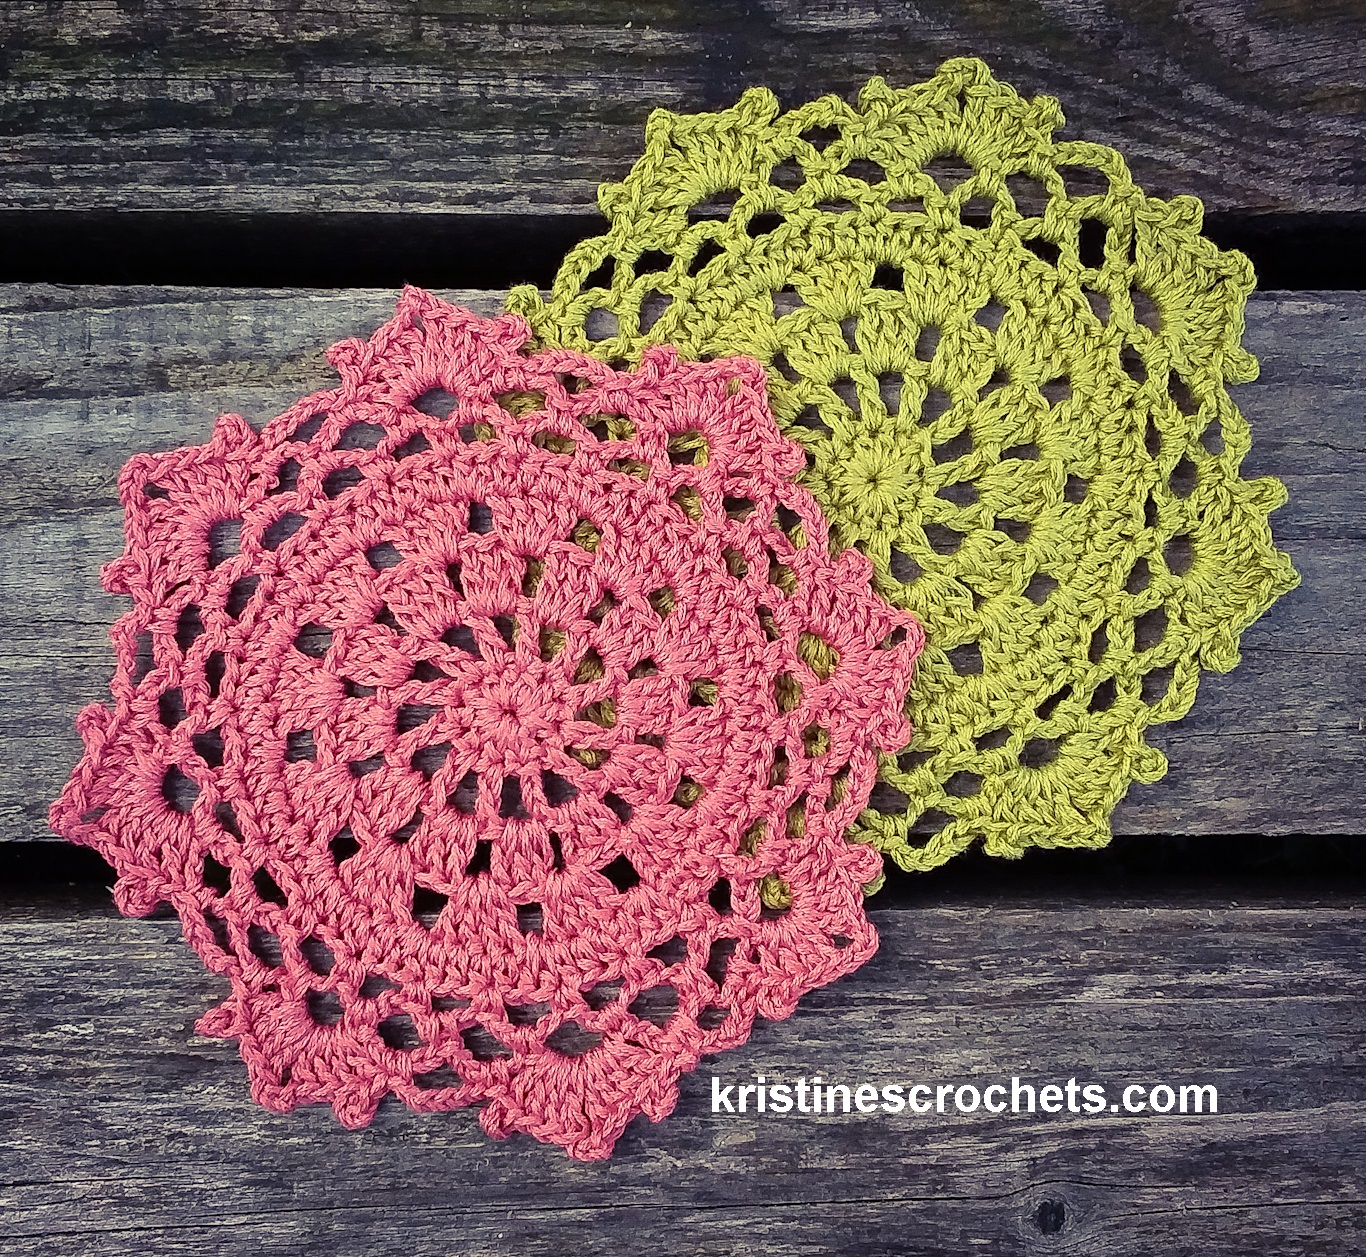
Today I have the Vintage Style Doily Placemat crochet pattern to share with you. Inspired by timeless heirloom crochet, this doily placemat brings classic elegance to your table. Perfect as a placemat, centerpiece, or decorative accent, this pattern is a relaxing project that adds handmade beauty to any space.
It is made in only 16 rounds using sport weight (size 2) yarn and a 3 mm crochet hook. All you need to start is a crochet hook and some yarn or thread in the color of your choice.
If you prefer to learn by watching, I have a 2 part video tutorial below. Or, scroll down to view the written pattern! Hope you enjoy!
Happy crocheting!😊
Video Tutorial:
Part 1 Round 1 - 9
Part 2 Round 10 - 16
Written Pattern
Size: The doily measures approximately 32cm (12,6 inches)in diameter. Skill Level: Easy to Intermediate - advanced beginner Materials Used:
Sport weight yarn, size 2 - fine. I used Madame Tricote Paris Camilla mercerised 100% cotton yarn. 150 meters (60 grams) of yarn needed for this pattern.
3 mm crochet hook.
Scissors.
Yarn needle or Latch hook for weaving in ends. Or, you can use a crochet hook.
Abbreviations (US terms) st(s) - stitch(es)
ch sp(s) - chain space(s) ch - chain sl st. - slip stitch sc - single crochet dc - double crochet
fpdc - front post double crochet ch3picot – ch3, insert your hook in third ch from the hook, yarn over, pull through all loops on the hook.
( )*- repeat instructions between parentheses the number of times indicated.
( ) - stitch count for each row is listed in italic parentheses at the end of each row.
Special Stitch Instructions:
fpdc - front post double crochet - Yarn over, insert the hook around the post of the stitch from front to back to front, yarn over, pull up a loop, yarn over, pull through 2 loops on your hook, yarn over, pull through remaining 2 loops on hook.
Instructions:
Start with ch5 and sl st. in first ch to form a ring. Or, you can make a
magic (adjustable) ring.
Round 1: ch3 (counts as 1 dc), 11 dc in ring.
Join with a sl st. in 3rd ch of beginning ch3.
(12 dc)
Round 2: ch3 (counts as 1 dc), 1 fpdc in same st,
(1
dc in next st, 1 fpdc in same st)* repeat 11 times around.
Join with a sl st. in 3rd ch of beginning ch3
(12 dc, 12 fpdc)
Round 3: ch3 (counts as 1 dc), 1 dc in same st, 1fpdc in next st,
(2
dc in next st, 1 fpdc in next st)* repeat 11 times around.
Join with sl st. in 3rd ch of beginning ch3.
(24 dc, 12 fpdc)
Round 4: ch3 (counts as 1 dc), 2 dc in next st, 1 fpdc in next st,
(1 dc in next st, 2 dc in next st, 1 fpdc in next st)* repeat 11 times
around.
Join with a sl st. in 3rd ch of beginning ch3.
(36 dc, 12 fpdc)
Round 5: ch3 (counts as 1 dc), 1 dc in next st, 2 dc in next st, 1 fpdc in next st,(1dc in next 2 sts, 2 dc in next st, 1 fpdc in next st)* repeat 11 times
around.
Join with a sl st. in 3rd ch of beginning ch3.
(48 dc, 12 fpdc)
Round 6: ch3 (counts as 1 dc), 1 dc in next 2 sts, 2 dc in next st, 1 fpdc in next
st,
(1dc in next 3 sts, 2 dc in next st, 1 fpdc in next st)* repeat 11 times
around.
Join with a sl st. in 3rd ch of beginning ch3.
(60 dc, 12 fpdc)
Round 7: ch3 (counts as 1 dc), 1 dc in next 3 sts, 2 dc in next st, 1 fpdc in next
st,
(1dc in next 4 sts, 2 dc in next st, 1 fpdc in next st)* repeat 11 times
around.
Join with a sl st. in 3rd ch of beginning ch3.
(72 dc, 12 fpdc)
Round 8: ch3 (counts as 1 dc), 1 dc in next 4 sts, 2 dc in next st, 1 fpdc in next
st,
(1dc in next 5 sts, 2 dc in next st, 1 fpdc in next st)* repeat 11 times
around.
Join with a sl st. in 3rd ch of beginning ch3.
(84 dc, 12 fpdc)
Round 9: ch3 (counts as 1 dc), 1 dc in next 5 sts, 2 dc in next st, 1 fpdc in next
st,
(1dc in next 6 sts, 2 dc in next st, 1 fpdc in next st)* repeat 11 times
around.
Join with a sl st. in 3rd ch of beginning ch3.
(96 dc, 12 fpdc)
Round 10: ch3 (counts as 1 dc), 1 dc in next 6 sts, 2 dc in next st, 1 fpdc in next
st,
(1dc in next 7 sts, 2 dc in next st, 1 fpdc in next st)* repeat 11 times
around.
Join with a sl st. in 3rd ch of beginning ch3.
(108 dc, 12 fpdc)
Round 11: ch3 (counts as 1 dc), 1 dc in next 7 sts, 2 dc in next st, 1 fpdc in next
st,
(1dc in next 8 sts, 2 dc in next st, 1 fpdc in next st)* repeat 11 times
around.
Join with a sl st. in 3rd ch of beginning ch3.
(120 dc, 12 fpdc)
Round 12: ch3 (counts as 1 dc), 1 dc in next 8 sts, 2 dc in next st, 1 fpdc in next
st,
(1dc in next 9 sts, 2 dc in next st, 1 fpdc in next st)* repeat 11 times
around.
Join with a sl st. in 3rd ch of beginning ch3.
(132 dc, 12 fpdc)
Round 13: ch4 (counts as 1 dc + ch1), 1 dc in same st, ch1,
(skip next 3 sts, (1dc, ch1, 1dc, ch1) in next st)* repeat 35 times around.
Join with a sl st. in beginning ch4 sp.
(72 dc, 72 ch1 sps)
Round 14: ch3 (counts as 1 dc), (1dc, ch1, 2dc, ch1) in same ch space,
(skip next st, skip next ch1 sp, skip next st, (2dc, ch1, 2dc, ch1) in next
ch1 sp)* repeat 35 times around.
Join with a sl st. in 3rd ch of beginning ch3.
(144 dc, 72 ch1 sps)
Round 15: sl st. in next st, sl st. in next ch1 sp, ch3 (counts as 1 dc), (2dc, ch2,
3dc) in same ch1 sp,
(skip next 2 sts, skip next ch1 sp, skip next 2 sts, (3dc, ch2, 3dc) in
next ch1 sp)* repeat 35 times around.
Join with a sl st. in 3rd ch of beginning ch3.
(216 dc, 36 ch2 sps)
Round 16: sl st. in next st, ch1 (doesn’t count as a st), 1 sc in same st, 1 sc in
next st, (1sc, ch3, 1sc) in next ch2 sp, 1sc in next 2 sts,
(skip next 2 sts, 1sc in next 2 sts, (1 sc, ch3, 1sc) in next ch2 sp, 1sc
in next 2 sts)* repeat 35 times around.
Join with a sl st. in first sc.
(216 sc, 36 ch3 sps)
Ch1, cut off the yarn, fasten off and weave in the ends.
Today I would like to share the Ocean Blush Asymmetrical Triangle Shawlcrochet pattern with you. This elegant lightweight triangle shawl is worked in back and forth rows to create an asymmetrical triangle shape. To make this shawl, you should be familiar with basic crochet stitches and terminology. All you need to start is one skein of your favourite fingering weight yarn (I used one skein of YarnArt Flowers gradient ''cake'' yarn) and a 4 mm crochet hook.
If you prefer to learn by watching, I have a video tutorial below. Or scroll down to view the written pattern! Happy Crocheting! 😊
You can also purchase the ad free printable PDF version of this pattern on my Etsy Shop or LoveCrafts
Finished Size:Approximately 127 cm (50 in) x 137 cm (54 in) x 182 cm (71,6 in) asymmetrical triangle; longest edge along increases.
Gauge: 17 dc stitches x 8 rows = 10cm x 10cm (4’’ x 4’’) in stitch pattern.
Skill Level:Easy to Intermediate - advanced beginner.
Materials Used:
Fingering weight yarn, size 1 - super fine. I used YarnArt Flowers (250g/ 1000m)55% cotton, 45% acrylic yarn in color262. 1 skeinof yarn needed for this pattern.
( )* – repeat instructions between the parentheses as directed.
() -
stitch count for each row is listed in italic parentheses at the end of each
row.
RS – right side – the front side of the work.
WS – wrong side – the back side of the work.
PATTERN NOTES:
The shawl is worked in back and forth rows to
form an asymmetrical triangle shape.
Increases are made on one edge only on each row to create the triangular shape, while the
opposite edge remains straight.
The shawl
gradually grows in width and length as you continue working rows.
You can adjust the size by adding or
subtracting pattern repeats (Rows 7 – 14).
Beginning (turning) ch3 and ch4 both count as 1 dc throughout the
pattern.
Blocking is recommended to enchance stitch definition and shape.
Instructions
Row 1 (WS): ch4 (counts as 1 dc + base ch), 3 dc in 4th ch from hook. (4 dc)
Row 2 (RS):ch4 (counts as 1 dc), turn, 2 dc in first st, 1dc in each of
remaining 3 sts (the last st goes in 4th ch of beginning ch4 from previous row). (6
dc)
Row 3 (WS): ch3 (counts as 1 dc), turn, skip first st, 1dc in next st, ch1,
skip next st, 1 dc in next st, ch1, skip next st, 3dc in last st (in 4th ch of
turning ch4 from previous row). (6 dc, 2 ch1 sps)
Row 4 (RS): ch4 (counts as 1 dc), turn, 2dc in first st, 1dc in each of next 2
sts.
(1dc
in next ch1 sp, 1dc in next st)* repeat 2 times.
1dc in last st (in 3rd ch of turning ch3 from previous row). (10 dc)
Row 5 (WS): ch3 (counts as 1dc), turn, skip first st., 1dc in next st, ch1.
(skip
next st, 1dc in next st, ch1)* repeat until 2 sts remain.
Skip next st, 3dc in last st (in 4th ch of turning ch4 from previous row).
(8 dc, 4 ch1 sps)
Row 6 (RS): ch4 (counts as 1 dc), turn, 2dc in first st, 1dc in each of next 2
sts.
(1dc
in next ch1 sp., 1dc in next st)* repeat until last st remains.
1dc in last st (in 3rd ch of turning ch3 from previous row). (14 dc)
Row 7 (WS): ch3 (counts as 1dc), turn, skip first st, 1dc in next st, ch1, skip
next st, dc3tog in next st, ch1.
(skip
next st, 1dc in next st, ch1, skip next st, dc3tog in next st, ch1)* repeat until 2 sts
remain.
Skip next st, 3dc in last st (in 4th ch of turning ch4 from previous row).
(7 dc, 3 dc3tog, 6 ch1 sps)
Row 8 (RS): ch4 (counts as 1dc), turn, 2dc in first st, ch1, skip next st,
dc3tog in next st, ch1, skip next ch1 sp, 1dc in next st, ch1.
(skip
next ch1 sp, dc3tog in next st, ch1, skip next ch1 sp, 1dc in next st, ch1)* repeat until 1 ch1 sp
and 2 sts remain.
Skip next ch1 sp, 1dc in each of last 2 sts (the last st goes in 3rd ch of
turning ch3 from previous row). (8 dc, 3 dc3tog, 7 ch1 sps)
Row 9 (WS): ch3 (counts as 1dc), turn, skip first st, 1dc in next st, ch1, skip
next st, dc3tog in next st, ch1.
(skip
next st, 1dc in next st, ch1, skip next st, dc3tog in next st, ch1)* repeat until 2 sts
remain.
Skip next st, 3dc in last st (in 4th ch of turning ch4 from previous row).
Make your own Textured Serenity Bag, a versatile and stylish crochet tote, perfect for everyday use. The pattern features a beautiful combination of double crochet and front post double crochet stitches, creating lovely texture and dimension. It'sworked from the bottom up in joined rounds.The handle straps are crocheted directly onto the body so the bag is one piece with no extra seaming.
I used YarnArt Macrame Cotton braidedcord type yarn (thickness - approx 2,5 mm), but any worsted weight cotton or cotton blend yarn will work.
If you want to learn how to crochet this bag, I have a video tutorial for you below. Or scroll down to view the written pattern!
Happy Crocheting! 😊
You can also purchase the ad free printable PDF version of this pattern on ETSY , RAVELRY or LOVECRAFTS
Video Tutorial:
Written Pattern:
Finished size:
Width: 34cm (13,4'')
Height without handle straps: 31 cm (12,2'')
Height with handle straps: 50 cm (19,7'')
Depth: 9cm (3,5'')
Gauge:8stitches x 3,5 rows = 5 cm (2’’) in double crochet
Skill Level:Easy to Intermediate (advanced beginner) Materials Used:
Worsted - Aran weight cord type yarn, size 4 - medium. I used YarnArt Macrame Cotton - (250 grams / 225 meters) - 80% Cotton, 20% Polyester. You will need approx 360 metres (2 skeins).
4 mm crochet hook.
Scissors.
Yarn needle.
4 stitch markers (optional).
Measuring tape.
Abbreviations (US terms):
st./sts - stitch / stitches
sk - skip
ch - chain
sl st. - slip stitch
sc - single crochet
dc - double crochet
fpdc - front post double crochet
( )* - repeat the instructions between the parentheses as directed.
( ) - stitch count for each row is listed in italic parentheses at the end of each row.
Special Stitch Instructions:
fpdc - front post double crochet - Yarn over, insert the hook around the post of the stitch from front to back to front, yarn over, pull up a loop, yarn over, pull through 2 loops on your hook, yarn over, pull through remaining 2 loops on hook.
Pattern Notes:
The bag is worked from the bottom up, in joined rounds.
You can adjust the width of the bag by adding or subtracting chain stitches of the foundation chain in a multiple of 4.
You can adjust the height of the bag by adding or subtracting pattern repeats (Round 5 - 6).
You can adjust the length of handles by increasing or decreasing the chains in Round 22.
Rounds are joined with a slip stitch – do not
include the joining slip stitch in your stitch count.
Instructions:
BASE
Foundation chain: ch32 (multiples of 4)
Round 1: 3dc in 3rd ch from hook, 1dc in each of next 28 ch sts., 6dc in last ch st.,
1dc in each of next 28 ch sts. on the other side of the foundation chain, 3dc in next ch st.
Join the round with a sl st. in first dc st.
(68 dc sts.)
Round 2: ch2 (doesn't count as a st.), 2dc in same st., 2dc in each of next 2 sts., 1dc in each of next 28 sts, 2dc in each of next 6 sts, 1dc in each of next 28 sts, 2dc in each of remaining 3 sts.
Join the round with a sl st. in first dc st.
(80 dc sts.)
Round 3: ch2 (doesn't count as a st.), 2dc in same st., 2dc in each of next 3 sts., 1dc in each of next 32 sts, 2dc in each of next 8 sts, 1dc in each of next 32 sts, 2dc in each of remaining 4 sts.
Join the round with a sl st. in first dc st.
(96 dc sts.)
BODY
Round 4: ch3 (counts as 1dc), sk next st., 3dc in next st.,
(sk next st., 1dc in next st., sk next st., 3dc in next st.)* repeat 23 times around.
Join the round with sl st. in 3rd ch of beginning ch3.
(96 dc sts.)
Round 5: ch3 (counts as 1dc), 2dc in same st., sk next st., 1fpdc in next st.,
(sk next st., 3dc in next st., sk next st., 1fpdc in next st.)* repeat 23 times around.
Join with a sl st. in 3rd ch of beginning ch3.
(72 dc sts., 24 fpdc sts.)
Round 6:drop loop from hook, insert hook from back to front through next st., place dropped loop back on hook and pull it through to the back.
ch2 (doesn't count as a st.), 1fpdc in same st. (around dc st. below), sk next st., 3dc in next st.,
(sk next st., 1fpdc in next st., sk next st., 3dc in next st.)* repeat 23 times around.
Join the round with a sl st. in first fpdc st.
(72 dc sts., 24 fpdc sts.)
Round 7 - 20: repeat Round 5 - 6
Round 21: ch1 (doesn't count as a st.), 1sc in same st., 1sc into each st. around.
Join the round with a sl st. in first sc.
(96 sc sts.)
HANDLE STRAPS
You can
choose one of the following methods for starting the handle strap round (Round
22). Choose the method that works best for you!
Method 1: Using stitch counts
Round 22: ch1 (doesn’t count as a st.), 1sc in same st., 1sc in
each of next 16 sts, ch60, sk next 21 sts, 1sc in each of next 27 sts, ch60,
sk next 21 sts, 1sc in each of remaining 10 sts until the end of round.
Join with a sl st. in first
sc st.
(54
sc sts, 120 ch sts.)
Method 2: Using measurements and stitch markers
Lay your bag on a flat
surface and place stitch markers approx 9 cm (3,5'') from the sides of
the bag to mark the handle strap positions (2 stitch markers on front and 2
on back panel of the bag). Make sure that they are in the same place on
both sides and continue with Round 22 as follows:
ch1 (doesn't count as a st.),
1sc in same st., 1sc in each st. until you get to the first stitch marker,
remove the marker and work 1sc in the marked st.
Ch60, skip all stitches until
the second stitch marker, remove the marker, work 1sc in the marked st.,
1sc in each st. until you get to the third stitch marker, remove the
marker, 1sc in the marked st.
Ch60, skip all stitches until
the fourth stitch marker, remove the marker, 1sc in the marked st., 1sc
in each st. until the end of the round.
Join with a sl st. in first
sc st.
Round 23: ch1 (doesn't count as a st.), 1sc in same st., 1sc in each st. and each ch st. around.
Join the round with a sl st. in first sc st.
(174 sc sts.)
Round 24:ch1 (doesn't count as a st.), 1sc in same st., 1sc in each st. around.
Join the round with a sl st. in first sc st.
(174 ch sts.)
Round 25: ch1 (doesn't count as s st.), sl st. in same st., sl st. in each st. around.
(174 sl sts.)
After the last st. you can choose one of the following methods to join the round:
Invisible join for a seamless finish:
Cut the yarn the yarn and pull the loop all the way through. Using a yarn needle, create an invisible join: insert the needle from back to front through the first st., then insert it in the back loop of the last st. Pull to shape the stitch, weave in ends.